Final image of Demon Ass Kicker Character contest over on the CG-Hub site.
Monday, May 23, 2011
Demon Ass Kicker Process..
So to keep things going until I start my painting my class in July, I have been participating in a number of different sketch challenges over on the CG-Hub site. The challenge this week was to do a character of a Demon Hunter. I decided to go full Painter on this one as a means to continue to compare the two programs (Painter vs. Photoshop). Below is the process post to the final image.
1. Start with a sketch as usual. I came up with a back story for this character to help to define the character more. (See below)
2. Drawing clean up (I did this in Photoshop) (See below):
3. Added tones (I found a new basic ink brush in Painter that gave clean basic tones):
1. Start with a sketch as usual. I came up with a back story for this character to help to define the character more. (See below)
2. Drawing clean up (I did this in Photoshop) (See below):
3. Added tones (I found a new basic ink brush in Painter that gave clean basic tones):
4. Added basic colors to the image (See below):
5. Final Color adjustments and lighting effects:
Sunday, May 15, 2011
LochNess Monster Tutorial
I have been working on learning both Photoshop and Painter, bit by bit.
A while back I got a Painter tuorial book that I have been making my way through. I put it down when the Photoshop classes started, but now that the Photoshop class is over with, I have picked the tutorial book back up again. This chapter focused on a Loch Ness Monster image (the image was not something that I drew). I just followed the steps and did the walk through as the book instructed. I liked this image a lot, so I thought that I would post it. Enjoy!
Wednesday, May 11, 2011
CG Hub Mermaid Challenge Process
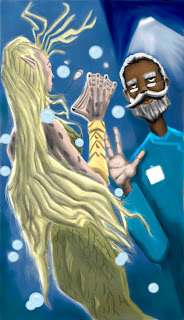
Ok, so I have been a little bit busy as of late. I have been taking a digital coloring class, for coloring line art using Photoshop, which was fun, and I definitely learned a lot. Since I couldn't color line art before, I have a little bit more in the skills department now that the class is over with. My next goal is to focus on learning how to digitally paint. Some of the principles on how to paint digitally and color line art are the same. So I decided to just try and go for broke and see if I could digitally paint an image based on the basic principles of value and color. So I decided to enter the CGHub Drawing Jam (which is a bi-weekl y contest where you have to submit an image based on a theme). The theme this time around was "Mermaids"...and below is my entry.
1. I first did a number of sketches, to try to come up with something that was both an interesting image and that told a litle bit of a story. I decided on the image below that tells a "mermaid in a jar" type story.
4. I then start to add basic flat color, using the established values as a guide (see below)
5. I then flatten the image and begin to work on adding color and texture "on top" of the flattened image focusing on lighting and setting the mood for the piece. (see below)
6. Once I like where the drawing is going I work to finish up the drawing and to then also focus on the little details like rear lighting, and bubbles (see below)
7. I then add rear lighting behind the professor, and work to complete all of the details in the image by using a really small brush. (see below)
8. As an uber last step, I add in a reflection in the image finish up the image and use the hue/saturation settings to finish up the image and voila my entry is done. (see below)
1. I first did a number of sketches, to try to come up with something that was both an interesting image and that told a litle bit of a story. I decided on the image below that tells a "mermaid in a jar" type story.
2. Then I added values to the image and tried to settle on the lighting and direction. (below)
3. When done I duplicated the "value layer" and prepared to start painting "between the two layers. (below)4. I then start to add basic flat color, using the established values as a guide (see below)
5. I then flatten the image and begin to work on adding color and texture "on top" of the flattened image focusing on lighting and setting the mood for the piece. (see below)
7. I then add rear lighting behind the professor, and work to complete all of the details in the image by using a really small brush. (see below)
8. As an uber last step, I add in a reflection in the image finish up the image and use the hue/saturation settings to finish up the image and voila my entry is done. (see below)
Subscribe to:
Comments (Atom)


