Tuesday, December 27, 2011

Nintendo Tribute: Double Dragon

Ok, so the next in the Nintendo tribute series is Double Dragon. You played as one of two brothers or friends (I think), who had to fight your way through hordes and hordes of street gangs to rescue your girlfriend. For this particular piece I decided to try to work on anatomy, but do it in a simplified manner to suggest the form, but not go overboard with the details. Hm. It took me a while to post this one, because I wasn't too hot on how it came out, however since I need to finish things I decided to post this one as a means to move onwards and learn from my mistakes. (Practice practice practice).
Steps are below:


In the end, it's not the worst, but in practicing I learned a few tricks a long the way to make the painting process easier. If I go over my original sketches and create a simple line drawing, that will eliminate having to work so hard when starting the color phase. Also, anatomy anatomy anatomy and values. Very hard to master, but I will be psyched when I get it. So that's it for this one, next up is Jimmy Lee (Double Dragon part II).

http://murdockink.tumblr.com/
http://moebocop.deviantart.com/
http://twitter.com/mauricemurdock


Subway Guy

Something quick that I did for practice.

http://murdockink.tumblr.com/
http://moebocop.deviantart.com/
http://twitter.com/mauricemurdock


Thursday, December 22, 2011

Manus in Wonderland Re-do


As I learn how to paint things and improve, I am going to be tempted to go back and rework stuff that I have already done. A friend of mine is starting a blog/site and asked me to do a piece for him, so I said "of course". When I went back and looked at what I did however, I was not happy with it at all. So, of course I re-did it. I am super happy with it, but I am sure that I will learn more as time goes on.

http://murdockink.tumblr.com/
http://moebocop.deviantart.com/
http://twitter.com/mauricemurdock


Sunday, December 11, 2011

Sonic the Hedgehog!

Ok so this week, I decided to do a rework of Sonic the Hedgehog, which was something that I had done a while back. but......I thought that it was lame (colors needed work, etc. etc.). So I went back and reworked this piece a big and finished it. Below is the final work:

Below are just a few notes about the work:

 Started with a sketch. I did a couple of drawings in my sketchbook, but decided to just go with the basic front shot of Sonic running at you.


 At this point last time I stopped and thought that it was done, but I decided to go one further and add another layer and paint on top of it, and to then add the color.


I found a sparkly brush and used that on the rings in the background. Here is Sonic folks enjoy!

Next Up: Double Dragon (again) ! Yee Haw!!!

http://murdockink.tumblr.com/
http://moebocop.deviantart.com/
http://twitter.com/mauricemurdock

Monday, December 5, 2011

Nintendo Tribute: Mario

A little surprise this week as I did an extra mini piece. You can't have a Nintendo tribute without Mario. Even though Mario has been done over a million times I haven't really done Mario before, and so I figured "why not". Here is the final!

(Final!!)
Here are the steps:


I started with a basic round brush, and then instead used different brushes that I created from an actual paintbrush. I noticed that the end result looks a lot mote textured and not as flat. In addition I used a color palette from an already existing Mario image, so that I can get the colors right (before they were looking really pastelle-y and too soft.

Next Up: Double Dragon! Yee Haw!!!

http://murdockink.tumblr.com/
http://moebocop.deviantart.com/
http://twitter.com/mauricemurdock

Sunday, December 4, 2011

Nintendo Tribute: Bubble Bobble!

The Nintendo Tribute for this week is "Bubble Bobble". Another game I played endlessly, it was super fun and involved dragons, bubbles and fruit! How fun! Below is the final piece, and below that are the steps! This one is going in the book as well! Enjoy!
1. Sketch
2. Values and shadows

 
 3.
 4.
 5.
 6.
Final!


http://murdockink.tumblr.com/
http://moebocop.deviantart.com/
http://twitter.com/mauricemurdock

Sunday, November 27, 2011

Nintendo Pro Wrestling: Step by Step Process


The next entry in my Nintendo tribute series is "Pro Wrestling". This is another game that I played for hours and hours on end. It was and is still one of my favorites to this day ("A winner is you!").
Below is the step by step to the final piece.


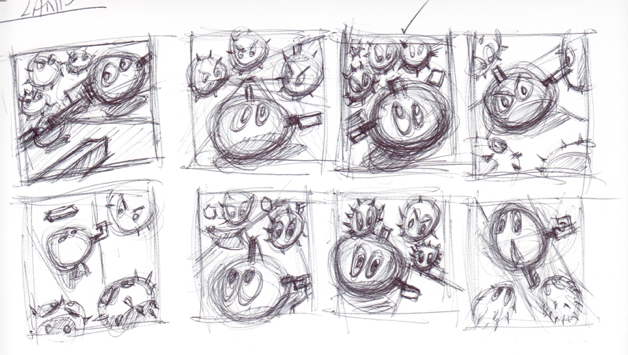
1. I wanted to do something that included all of the wrestlers naturally, so I did a couple of different sketches, of all the wrestlers in different poses, and finally settled on the one below. It basically has all of the wrestlers in the front, and Great Puma (the Champion of the VWL--Video Wrestling League) in the back overshadowing the rest of the wrestlers. (below)
2. Then I added a base black and white color and started to block in the shadows (below)
3. I added a background color to give the painting an overall sense of color (purple seemed to work well in the color scheme of the rest of the wrestlers in the group shot) (below)
4. Then I started to add the flat colors over all of the wrestlers (I used the original game instruction manual as a basis for the colors (below)
5. I next started to do the paintover layer, and went over all of the details and the edges. I had a little trouble with Starman's arms as they were folded over each other. So I had to spend a little time going over that some more. Also, now that I am looking at it Figher Hayabusa's shoulder (lower left next to The Amazon) looks a little humpy and weird. As always the biggest issue that I had was anatomy, although I felt that with this piece I am getting a little better. The key as always is practice (below)


6. Finally I added final shadows, and lighting, and used the text from the actual Pro-Wrestling box and voila! Done...it's going in the book.

Next up, Bubble Bobble!!!!!


http://murdockink.tumblr.com/
http://moebocop.deviantart.com/
http://twitter.com/mauricemurdock

Saturday, November 19, 2011

Nintendo Tribute "Clu Clu Land" (and Process)

Here is a basic posting of the process for Clu Clu land from pretty much beginning to end.
A lot of the steps are the same, so I will only make notes where I think it is necessary:
 

1. I started with a bunch of composition sketches as always. (below)
2. I picked the one that I thought was most interesting. (below)
3. I added tones and shadows (below)
4. I then started to add the flat colors. In mid process I realized that I didn't like what was happening with the hand. I realized that it would be easier to paint in an actual hand over the image so I added that in (below)
5. I then painted over the basic colors. I decided that I didn't like what was happening with the textures in the Trojan piece, so I decided to not* get fancy and just used a basic round brush. I set the options so that the pen pressure controls would allow for a lot of sensitivity. (below)
6. The picture was very flat at this point and was missing some elements so, I added in a jewel (which is what you collect in the game) and then I also added in some poles (which in the original game your character uses to swing around and make turns to collect the jewels) (below)
7. I then tried to really push the lighting so that objects that are closer would stand out a lot more from objects that are further away (to try and give it a sense of depth) I also added in lighting and played with the shadows some more. (below)
8. Done and Done!