Sunday, November 27, 2011

Nintendo Pro Wrestling: Step by Step Process


The next entry in my Nintendo tribute series is "Pro Wrestling". This is another game that I played for hours and hours on end. It was and is still one of my favorites to this day ("A winner is you!").
Below is the step by step to the final piece.


1. I wanted to do something that included all of the wrestlers naturally, so I did a couple of different sketches, of all the wrestlers in different poses, and finally settled on the one below. It basically has all of the wrestlers in the front, and Great Puma (the Champion of the VWL--Video Wrestling League) in the back overshadowing the rest of the wrestlers. (below)
2. Then I added a base black and white color and started to block in the shadows (below)
3. I added a background color to give the painting an overall sense of color (purple seemed to work well in the color scheme of the rest of the wrestlers in the group shot) (below)
4. Then I started to add the flat colors over all of the wrestlers (I used the original game instruction manual as a basis for the colors (below)
5. I next started to do the paintover layer, and went over all of the details and the edges. I had a little trouble with Starman's arms as they were folded over each other. So I had to spend a little time going over that some more. Also, now that I am looking at it Figher Hayabusa's shoulder (lower left next to The Amazon) looks a little humpy and weird. As always the biggest issue that I had was anatomy, although I felt that with this piece I am getting a little better. The key as always is practice (below)


6. Finally I added final shadows, and lighting, and used the text from the actual Pro-Wrestling box and voila! Done...it's going in the book.

Next up, Bubble Bobble!!!!!


http://murdockink.tumblr.com/
http://moebocop.deviantart.com/
http://twitter.com/mauricemurdock

Saturday, November 19, 2011

Nintendo Tribute "Clu Clu Land" (and Process)

Here is a basic posting of the process for Clu Clu land from pretty much beginning to end.
A lot of the steps are the same, so I will only make notes where I think it is necessary:
 

1. I started with a bunch of composition sketches as always. (below)
2. I picked the one that I thought was most interesting. (below)
3. I added tones and shadows (below)
4. I then started to add the flat colors. In mid process I realized that I didn't like what was happening with the hand. I realized that it would be easier to paint in an actual hand over the image so I added that in (below)
5. I then painted over the basic colors. I decided that I didn't like what was happening with the textures in the Trojan piece, so I decided to not* get fancy and just used a basic round brush. I set the options so that the pen pressure controls would allow for a lot of sensitivity. (below)
6. The picture was very flat at this point and was missing some elements so, I added in a jewel (which is what you collect in the game) and then I also added in some poles (which in the original game your character uses to swing around and make turns to collect the jewels) (below)
7. I then tried to really push the lighting so that objects that are closer would stand out a lot more from objects that are further away (to try and give it a sense of depth) I also added in lighting and played with the shadows some more. (below)
8. Done and Done!

Sunday, November 13, 2011

Obscure Nintendo Games "Trojan"--Process Post

This is the second of a series of posts about how I came to a final piece. In this case the piece in question is "Trojan" which is based on an old school Nintendo game of the same name. It was one of the first games that I played (non stop I might add) and I wanted to do more of a tribute piece to it.
I wanted to try and really do a good job with this one, building on the mistakes that I picked up from the the last piece, with coloring and lighting and so on.

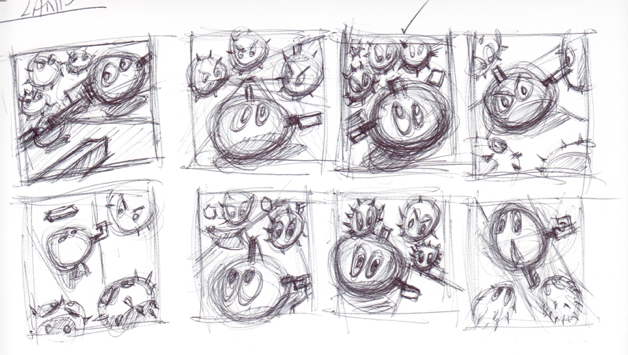
So as always I worked a lot on composition and figuring out what worked best in terms of shapes and arrangements (below). I would take a day or so to work on this and tried different arrangements until I was happy with a potential sketch.
Next comes the scan into Photoshop. I would then get the piece ready for the draw-over and the toning and shading parts. (below). In general I was happy with the general composition and did a lot of research and used a lot of reference to come up with the final drawing.
I would then start to add tones and start to

Then I started to add the values. The last time around I would kind of glance over the drawing value stage with the assumption that I would be able to fix it in the paint over stage. However I realized that if you don't have good values and established lighting up front, then you will have to work harder later on to fix things and your painting won't look right. So I spent a lot more time on figuring out the lighting and the light source. (below)

I then started coloring (below). I generally first try and pick a color scheme using this site that I found on another blog called "color scheme designer". http://colorschemedesigner.com/.
Then I start from the center and then work outwards.
I kept working outward until everything had a general color that I felt would serve as a good base. I usually call this my color flat layer (below)
I then painted over everything on a new layer trying to cover all of the lines, while maintaining the color scheme and the lighting structure. (below)
Next I would work on hilighting the moon and the parts of the painting that are high reflection areas (below)
From there I then add general lighting and try and add atmosphere to the painting. you will also notice that I put in a glow for the moon, the armor the shield as well as the main villain "Achilles" which was the main villain in the game. (below) The final step is to also add a layer of purple to the entire drawing to give the whole thing a sense of atmosphere and color. I would do this by adding a new layer to the entire flattened drawing and then erasing away the color layer. It helps to brighten the drawing and to also add some flavor as well.
The last step is to add a signature and any final touches and voila! Done! See ya next time!

Obscure Nintendo Games Series: "Trojan"


As part of the obscure Nintendo games series art book that I will be putting out for the next MOCCA fest, I present to you "Trojan". Trojan is a Capcom game which was adapted from the arcade (which I never played in the arcade but I sure as hell played the hell out of the home version). It was one of the early series of games that were released for the first 8-bit NES. I like the way that it came out, but def. there are things that I can improve on. I will post the process shortly.

http://murdockink.tumblr.com/
http://moebocop.deviantart.com/
http://twitter.com/mauricemurdock
http://murdockink.blogspot.com/

Sunday, November 6, 2011

Mighty Bomb Jack (Process Post)

I have been trying to think of a these for the MOCCA fest book that will be out for the April show. I think that for the first official book, I am going to do a collection of paintings/pieces from Nintendo games that I grew up playing (and there were a lot). One of the first games that I grew up playing was Mighty Bomb Jack (a game where you were super hero who had to collect bombs and avoid mummies and floating skulls. Very fun!)


One of the things that I have learned was that I need to focus more on shapes and composition. I did a number of sketches to try and figure out what the best composition would be (below)
Then I scanned the composition/sketch that I liked and then went over it again in Photoshop and Painter. I then started to add the shadow values an tried to keep the light source in mind. (below)

I then started to add in the flat colors on a new layer (I started with the center figure first). (below)
...then continuing onto the background layers after..(below)
Then finally I covered everything with a paintover layer, added the textures, lighting effects and final polish. (below)


Mighty Bomb Jack


This is a piece that I completed recently from a game that I played on the N.E.S. called “Mighty Bomb Jack”. This is probably going to go into the art book of 80’s games that I am putting together for MOCCA fest in April. While I am not the best painter yet, I hope to get better over time. Enjoy!
http://murdockink.tumblr.com/
http://moebocop.deviantart.com/
http://twitter.com/mauricemurdock
http://murdockink.blogspot.com/